Import/Export App
In a primary health system, the HMIS typically involves a distributed application, where the same application is running in different geographical locations (PHCs,CHCs, hospitals, districts, and state). Many of these physical locations do not have Internet connectivity, and hence they work off-line. At some point (normally at the district level), the data needs to be synchronised in order to have a consolidated database for the a particular geographical region. For this, it is important to be able to export data from one location (which is working offline, say at the health facility level) and import into another one (say at the district level). This feature of exporting and importing is thus a crucial function of a HMIS. This feature also helps us overcome the dependency on the Internet to some degree, as data updates can be transferred via USB key where there is no connectivity, or through email where there is limited Internet connectivity. DHIS2 provides robust import-export functionality to fulfil these needs.
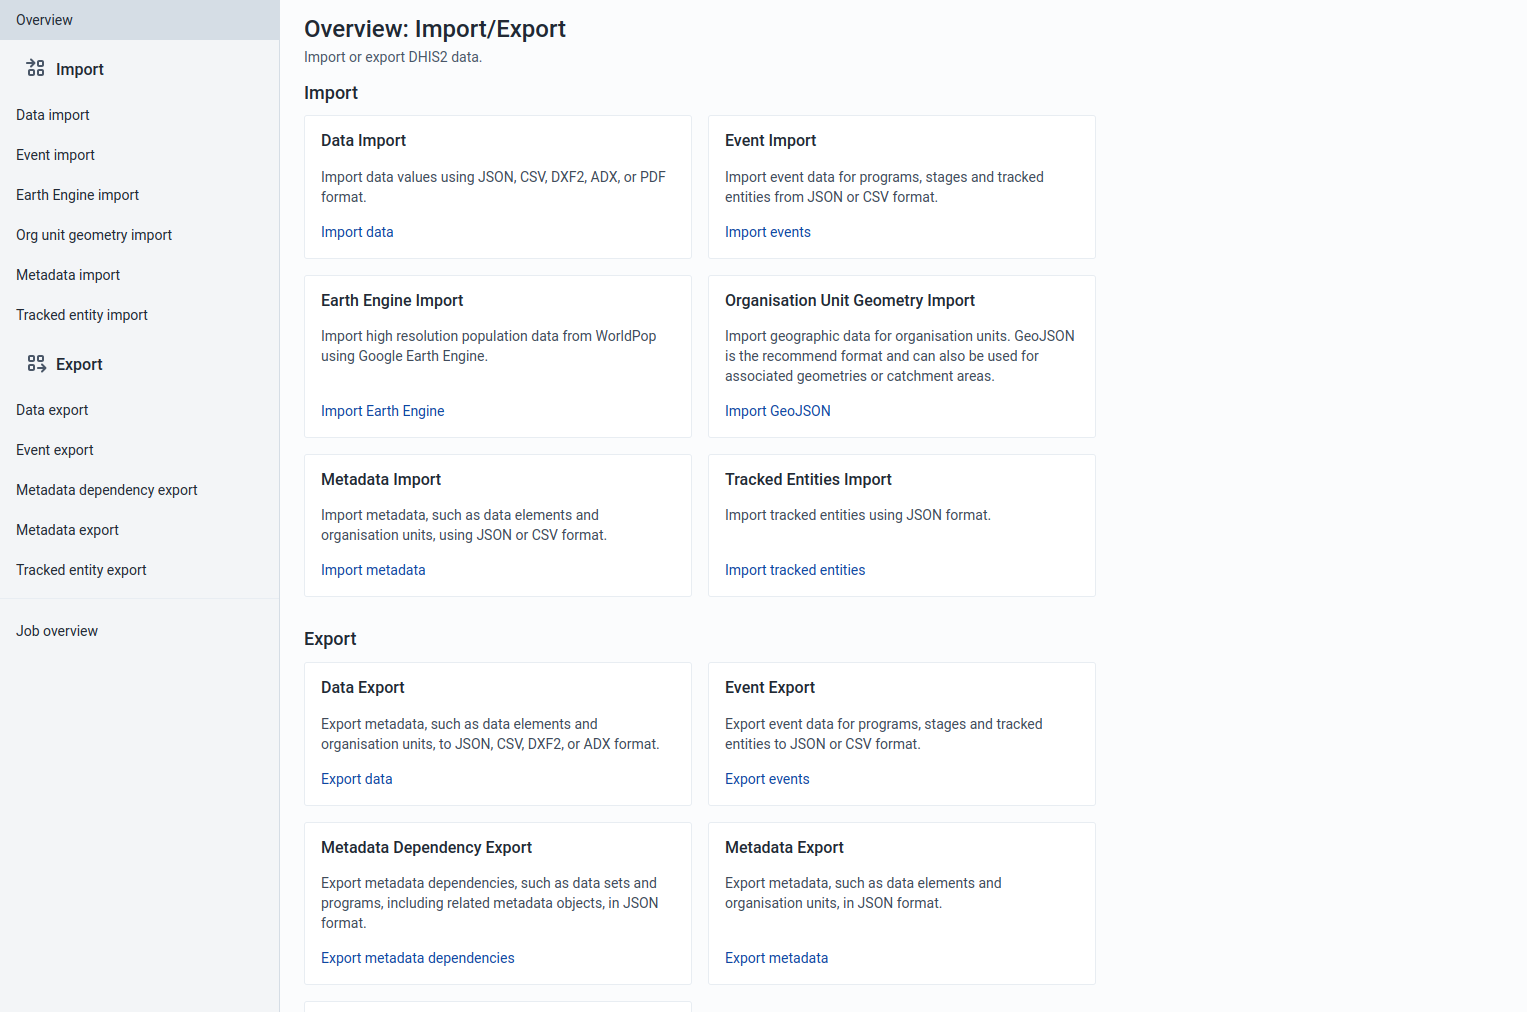
To access the Import/Export app, search in the top header bar for Import/Export. Import/Export app offers a number of services details for which can be found below.
Importing data
Import progress logger
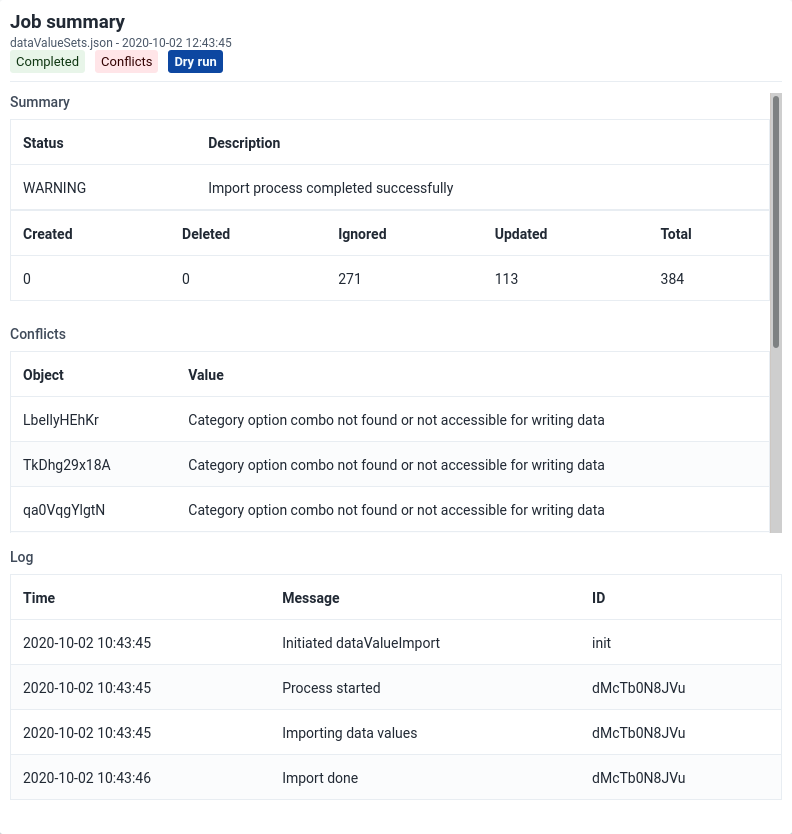
No matter what you import ("Data", "Events", "Org unit geometry", "Metadata" or "Tracked entity" data), you can always view the progress of the import by looking at the "Job Summary" at the top of the page.
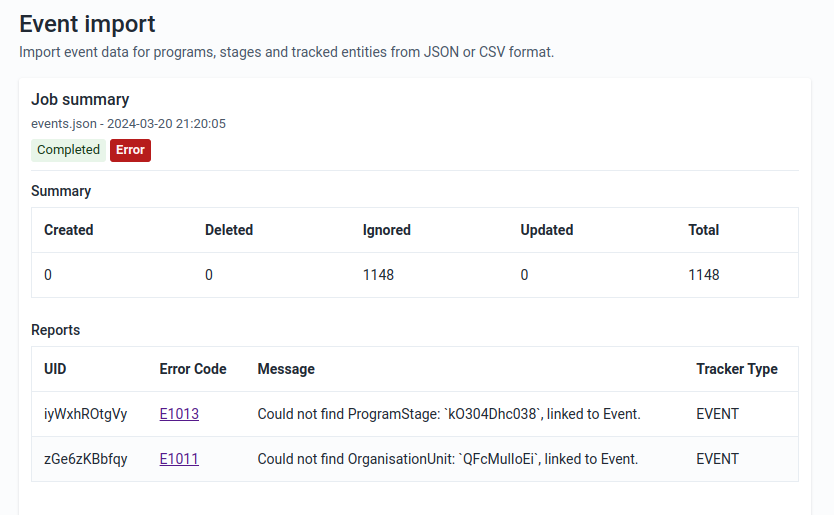
Import Summaries
On import request completion, we show import summaries above the import form. Any conflicts or errors are shown in the table under the main summary for the import.
Metadata Import
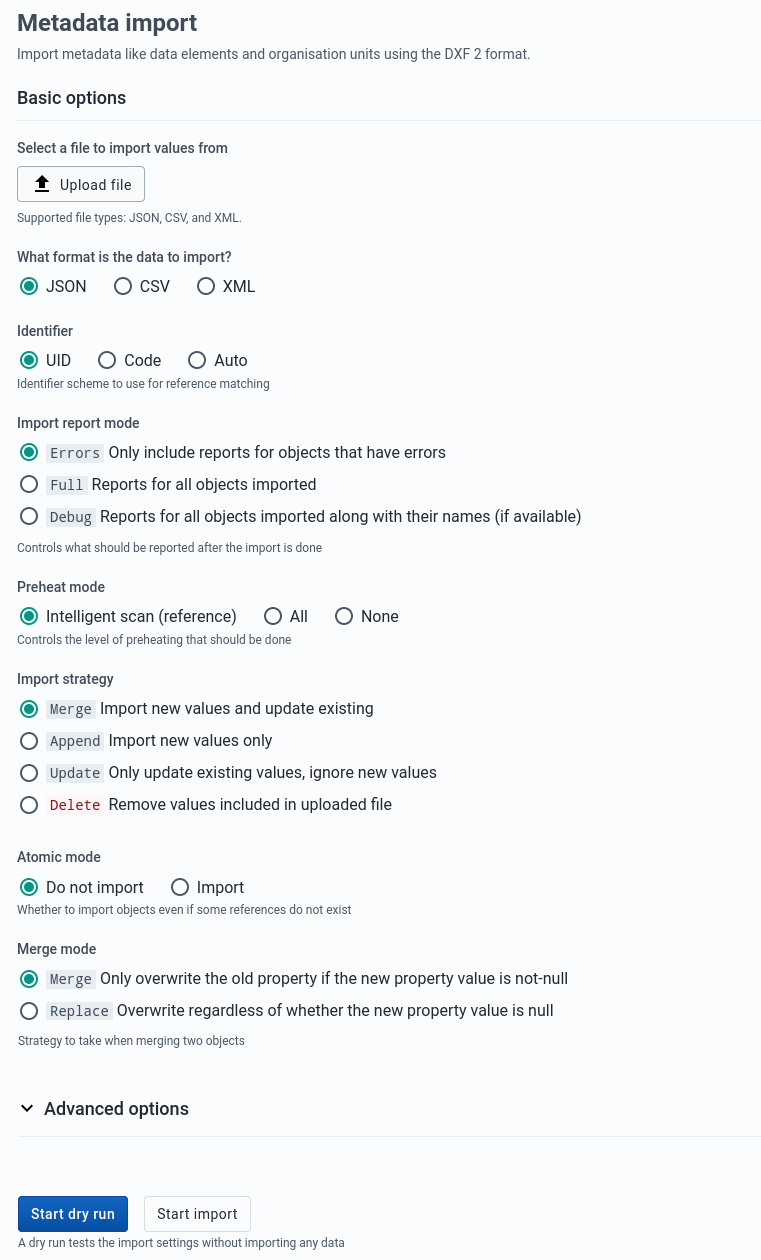
Metadata Import can be accessed from the sidebar by clicking on Metadata Import.
-
Choose a file to upload
-
Select a format: JSON , CSV, or XML
-
Select the appropriate settings for:
- Identifier
- Import report mode
- Preheat mode
- Import strategy
- Atomic mode
- Merge mode
-
Click Advanced options if you want to adjust one or more of the following settings before importing:
- Flush mode
- Skip sharing
- Skip validation
- Async
- Inclusive strategy
-
Click on the Import button which will upload the file and start the importing process.
Tip
It is highly recommend to use the Dry run option to test before importing data; to make sure you keep control over any changes to your Metadata, and to check for problems with out-of-sync data elements or organisation unit names
Note
If an organisation unit e.g.
Nduvuibu MCHPhad a unknown reference to an object with IDaaaU6Kr7Gtpidn, it means that the object with IDaaaU6Kr7Gtpidnwas not present in your imported file, and it was not found in the existing database.You can control this using Identifier option, to indicate if you want to allow objects with such invalid references to be imported or not. If you choose to import invalid references you will have to correct the reference manually in DHIS2 later.
Matching Identifiers in DXF2
The DXF2 format currently support matching for two identifiers, the internal DHIS2 identifier (known as a UID), and also using an external identifier called called a "code". When the importer is trying to search for references (like the one above), it will first go to the UID field, and then to the code field. This allows you to import from legacy systems without having a UID for every meta-data object. I.e. if you are importing facility data from a legacy system, you can leave out the ID field completely (DHIS2 will fill this in for you) and put the legacy system's own identifiers in the code field, this identifier is required to be unique. This not only works for organisation units, but for all kinds of meta-data, allowing for easy import from other systems.
Data Import
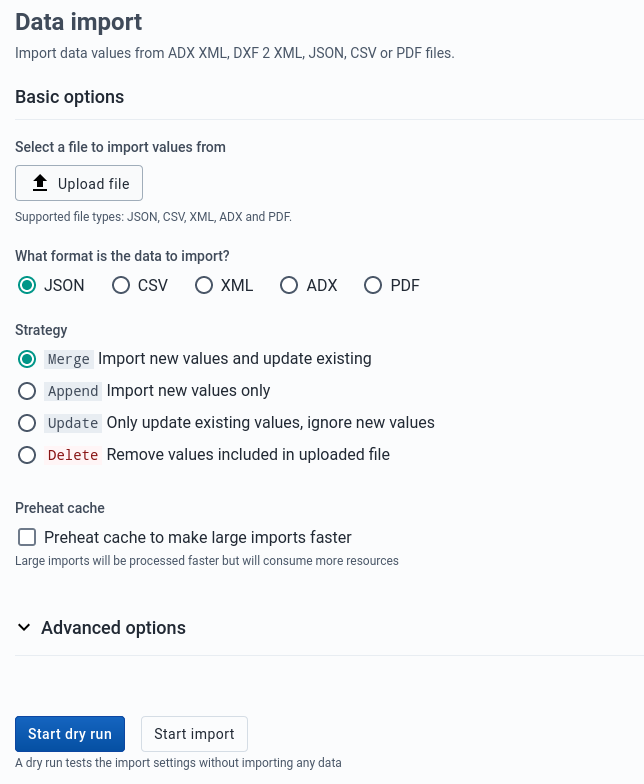
Data Import can be accessed from the sidebar by clicking on Data Import.
-
Choose a file to upload
-
Select a format: JSON, CSV, XML, ADX, or PDF
-
Select the appropriate settings for:
- Strategy
- Preheat cache
-
Click Advanced options if you want to adjust one or more of the following settings before importing:
- Data element ID scheme
- Org unit ID scheme
- ID scheme
- Skip existing check
-
Click on the Import button which will upload the file and start the importing process.
Tip
It is highly recommend to use the Dry run option to test before importing data; to make sure you keep control over any changes to your Metadata, and to check for problems with out-of-sync data elements or organisation unit names
PDF Data
DHIS2 supports import of data in the PDF format. This can be used to import data produced by off-line PDF data entry forms. Please refer to the section Data set management for details on how to produce a PDF form which can be used for off-line data entry.
To import a PDF data file, navigate to the PDF Data Import item in the side menu. Upload the completed PDF file and click Import.
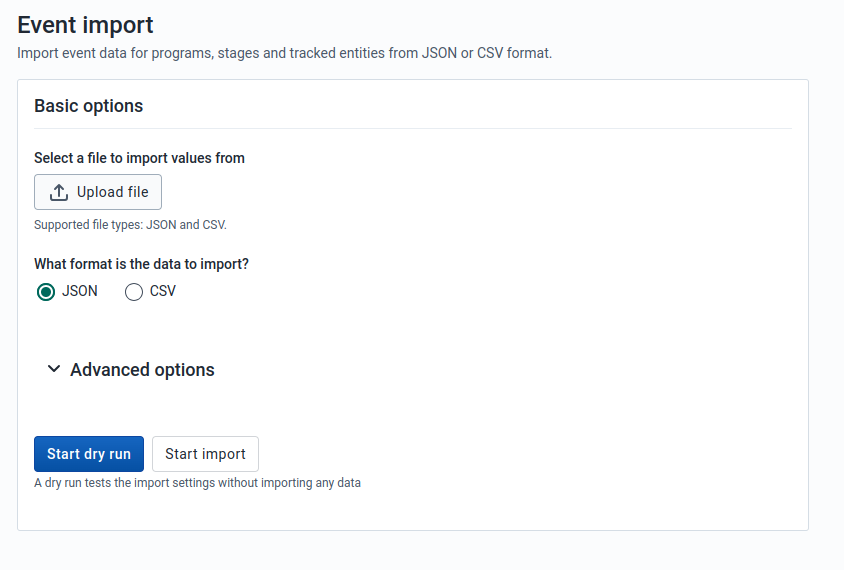
Event Import
Event Import can be accessed from the sidebar by clicking on Event Import.
-
Select a format: JSON or CSV.
-
Click Advanced options if you want to adjust one or more of the following settings before importing:
- Event ID scheme
- Data element ID scheme
- Org unit ID scheme
- ID scheme
-
Click on the Import button which will upload the file and start the importing process.
Earth Engine Import
Earth Engine Import can be accessed from the sidebar by clicking on Earth Engine Import.
Import high resolution population data from WorldPop using Google Earth Engine. A Google Earth Engine account is required to use this importer.
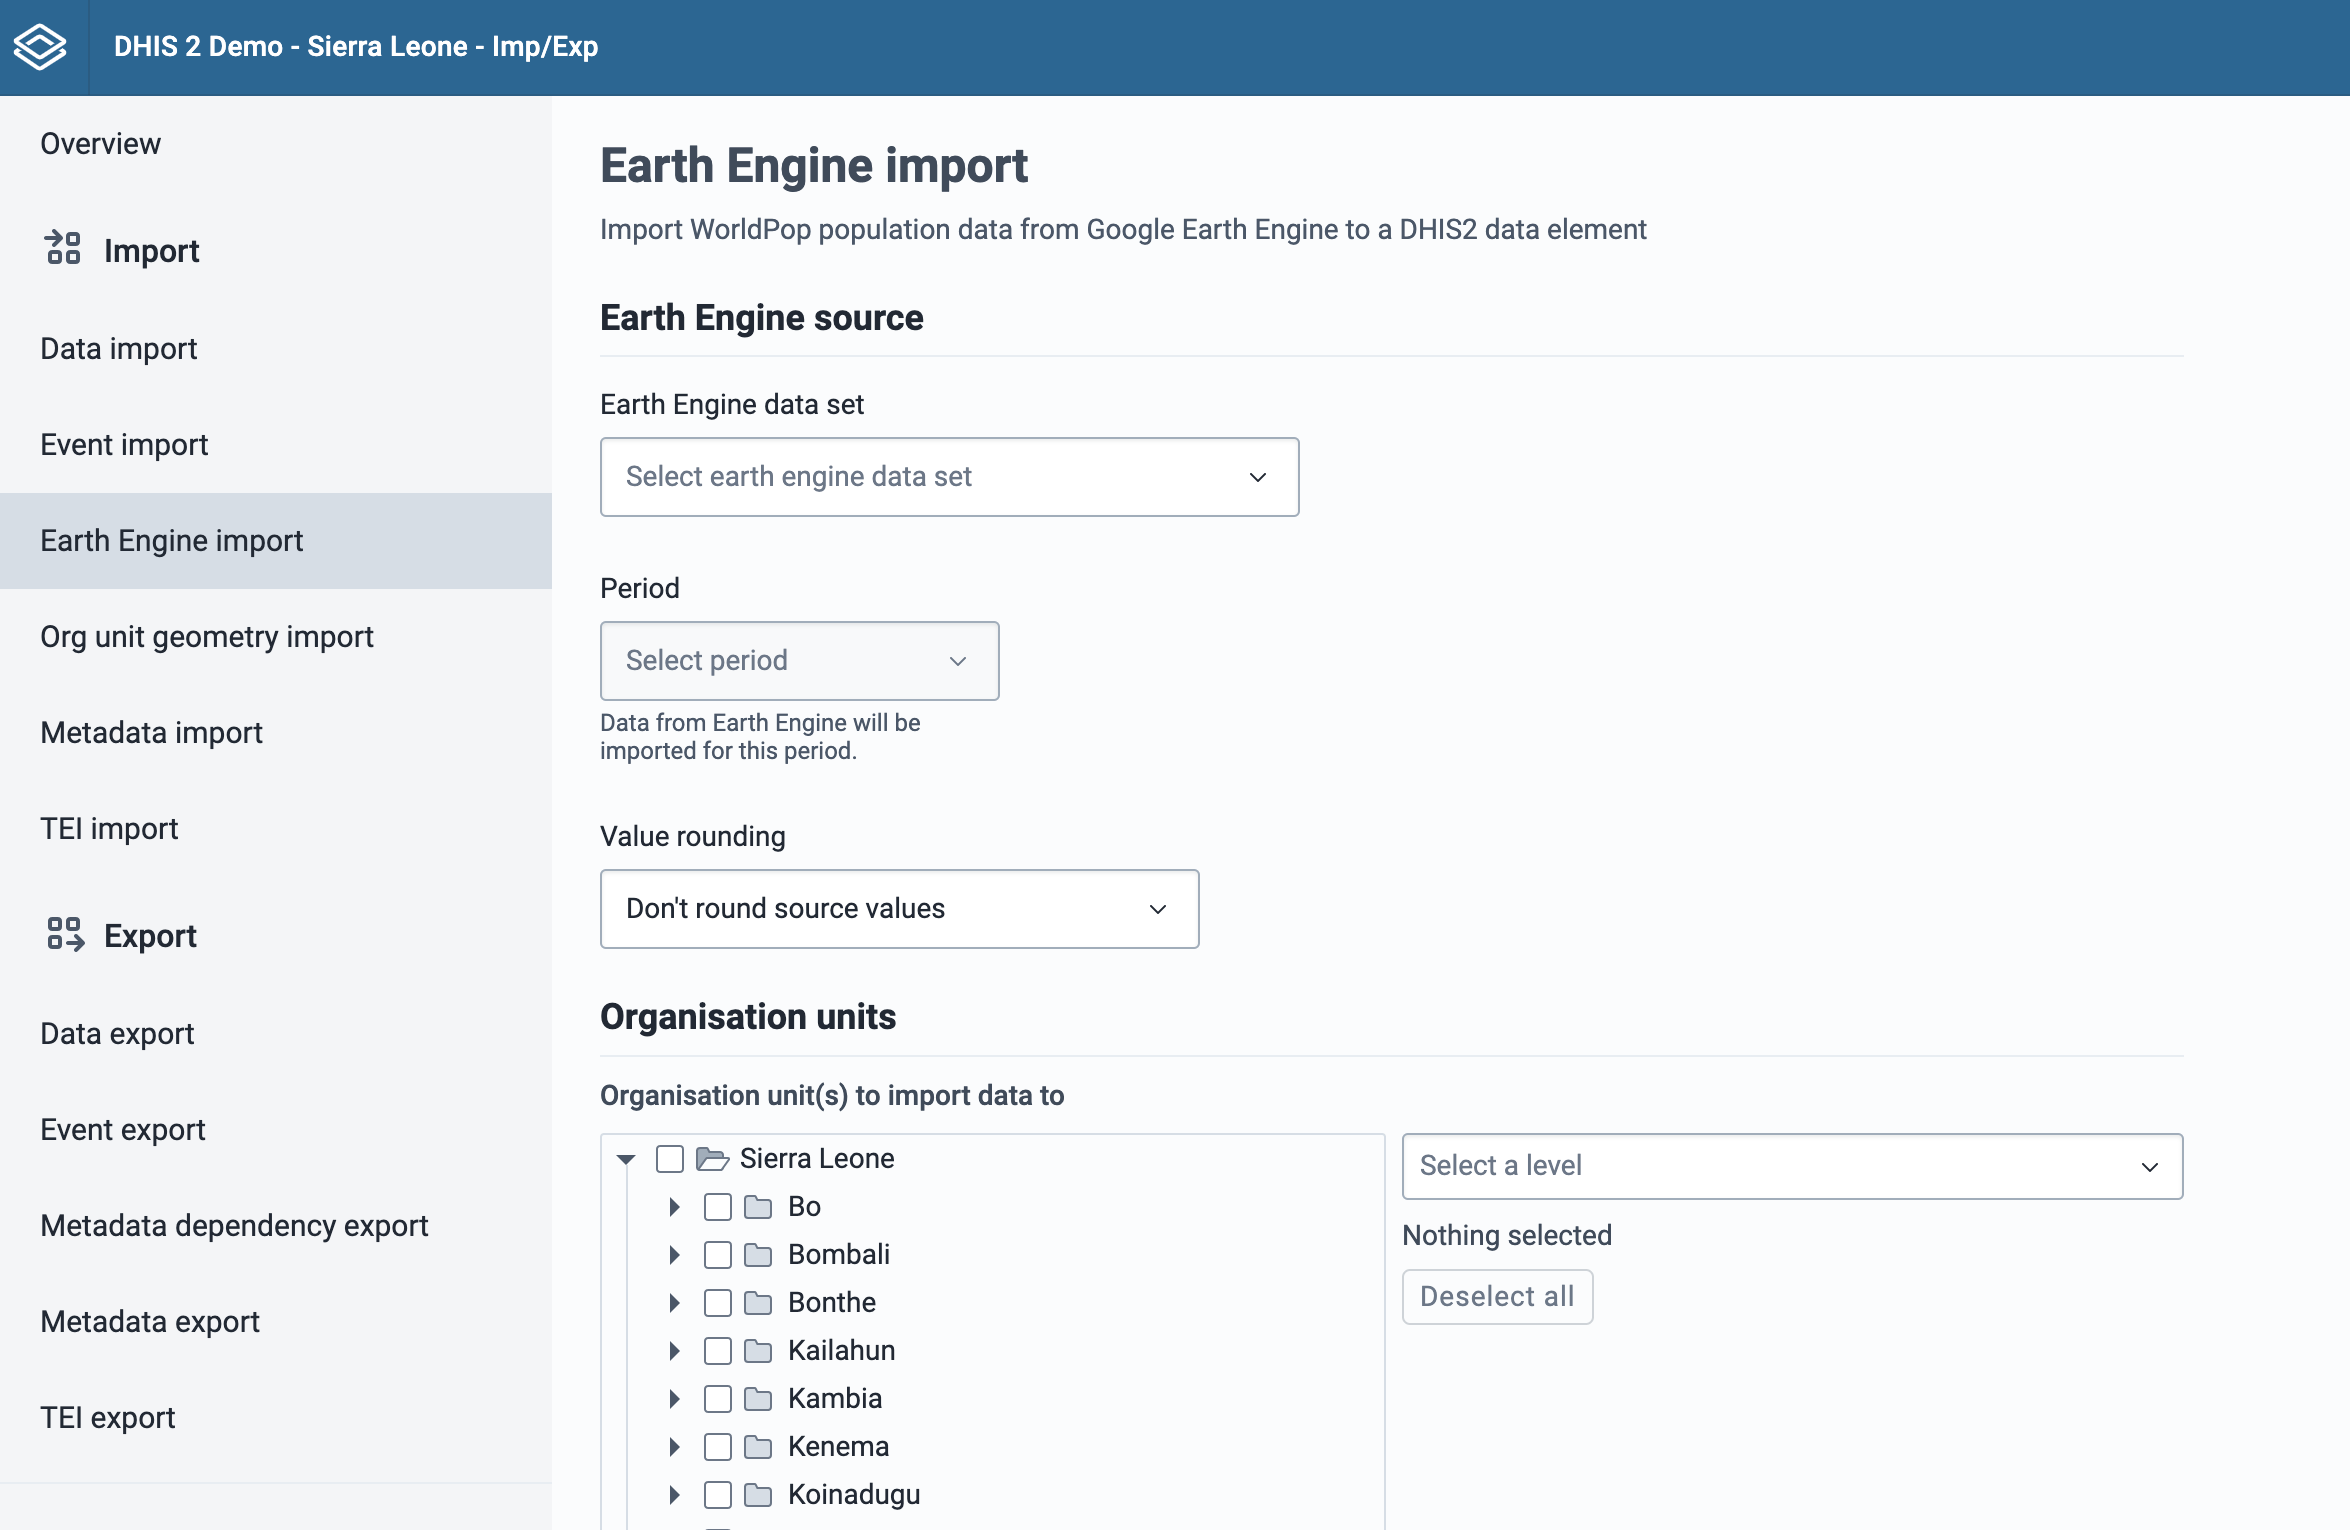
Select which Earth Engine data should be imported
The first section of the form is used to configure the Earth Engine data to import.
-
Select which Earth Engine dataset should be imported. Currently the choices are Population and Population age groups.
-
After a dataset has been selected, a period must be selected. Only one period can be imported at a time.
-
Choose how the data should be rounded. By default data is not rounded.
-
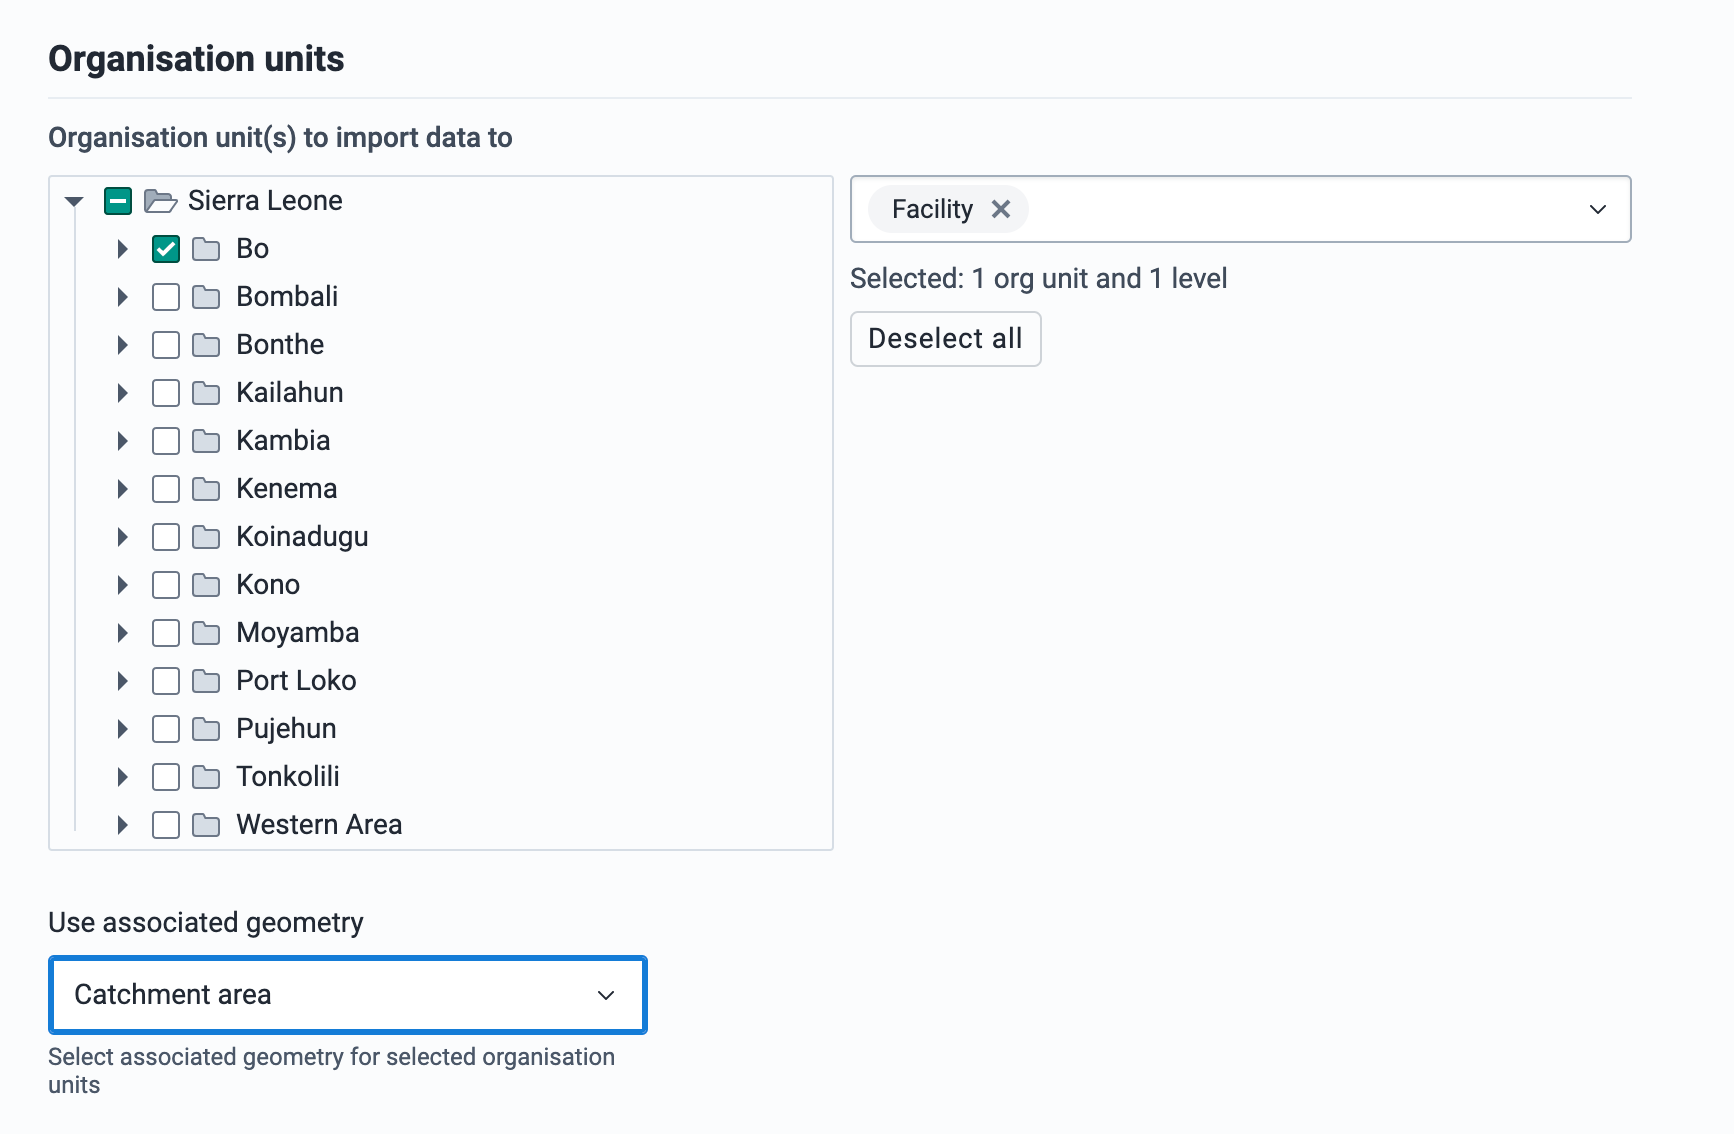
Select which organisation units to import data to. If you select facility level organisation units, then you must choose an associated geometry for the facilities. Without an associated geometry for facilities, the Earth Engine cannot determine the population.
Select the data elements to import the Earth Engine data into
Once you have configured the Earth Engine dataset, you need to select which data element to import the data to. For datasets with disaggregation groups, such as "Population age groups", the DHIS2 data element must have disaggregations in the form of category option combos that match the Earth Engine dataset disaggregation groups.
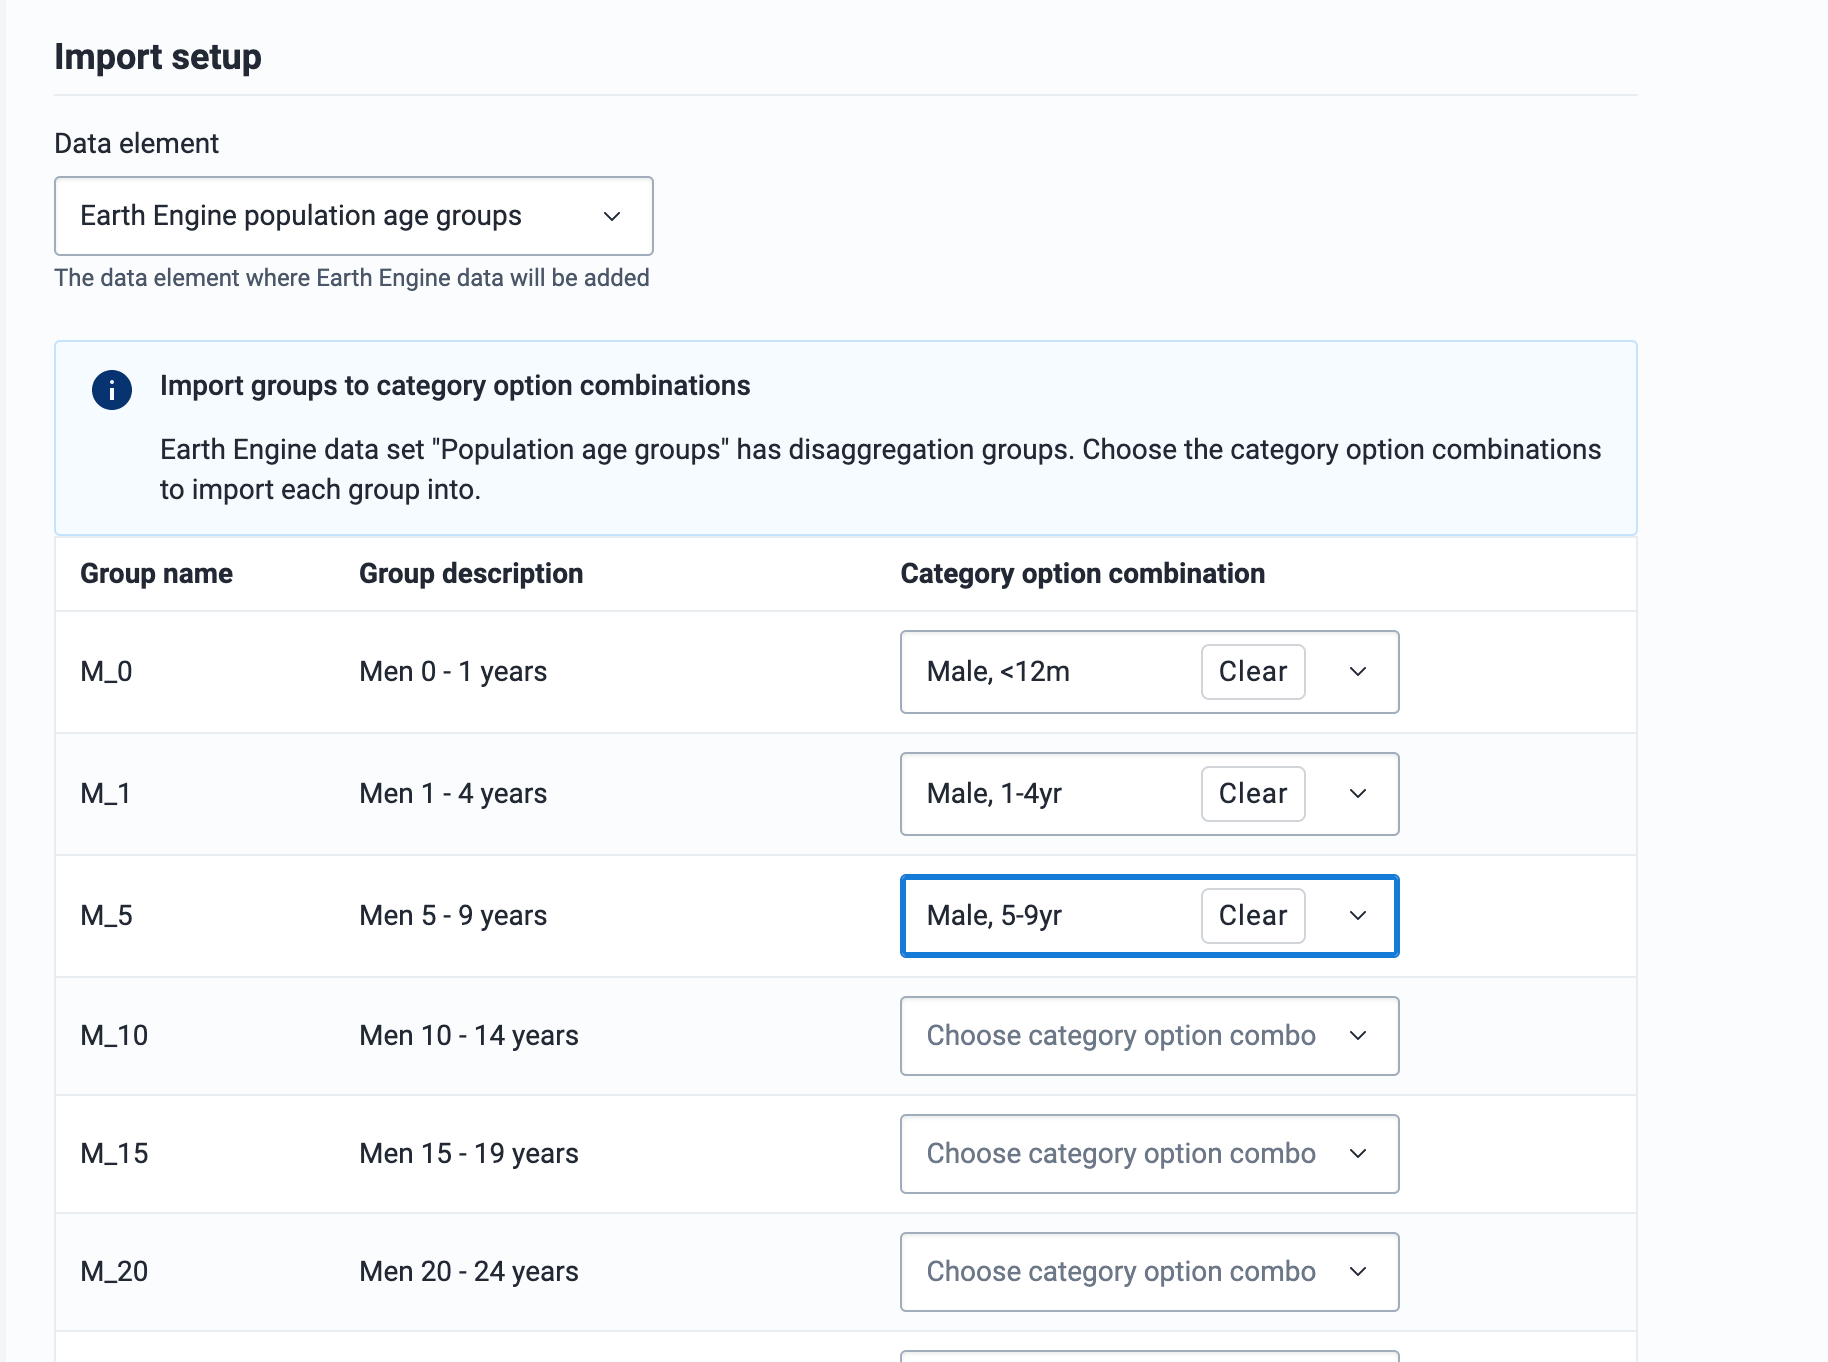
Configuring data elements for Earth Engine import
When configuring the DHIS2 data elements that will contain Earth Engine data, if you plan to import data to multiple org unit levels, ensure that those levels are added as Aggregation Levels in the data element configuration.
Some Earth Engine datasets contain disaggregation groups, the DHIS2 data element must be configured with corresponding category option combos. For example the "Population age groups" dataset is disaggregated by gender (Male, Female) and 5-year age groups.
Pro-tip: To automatically match the category option combo to the Earth Engine disaggregation group, add a Code to each category option combo that matches the earth engine group name. For example, with "Population age groups", the groups are named: F_0, F_1, F_5..., M_0, M_1, M_5...
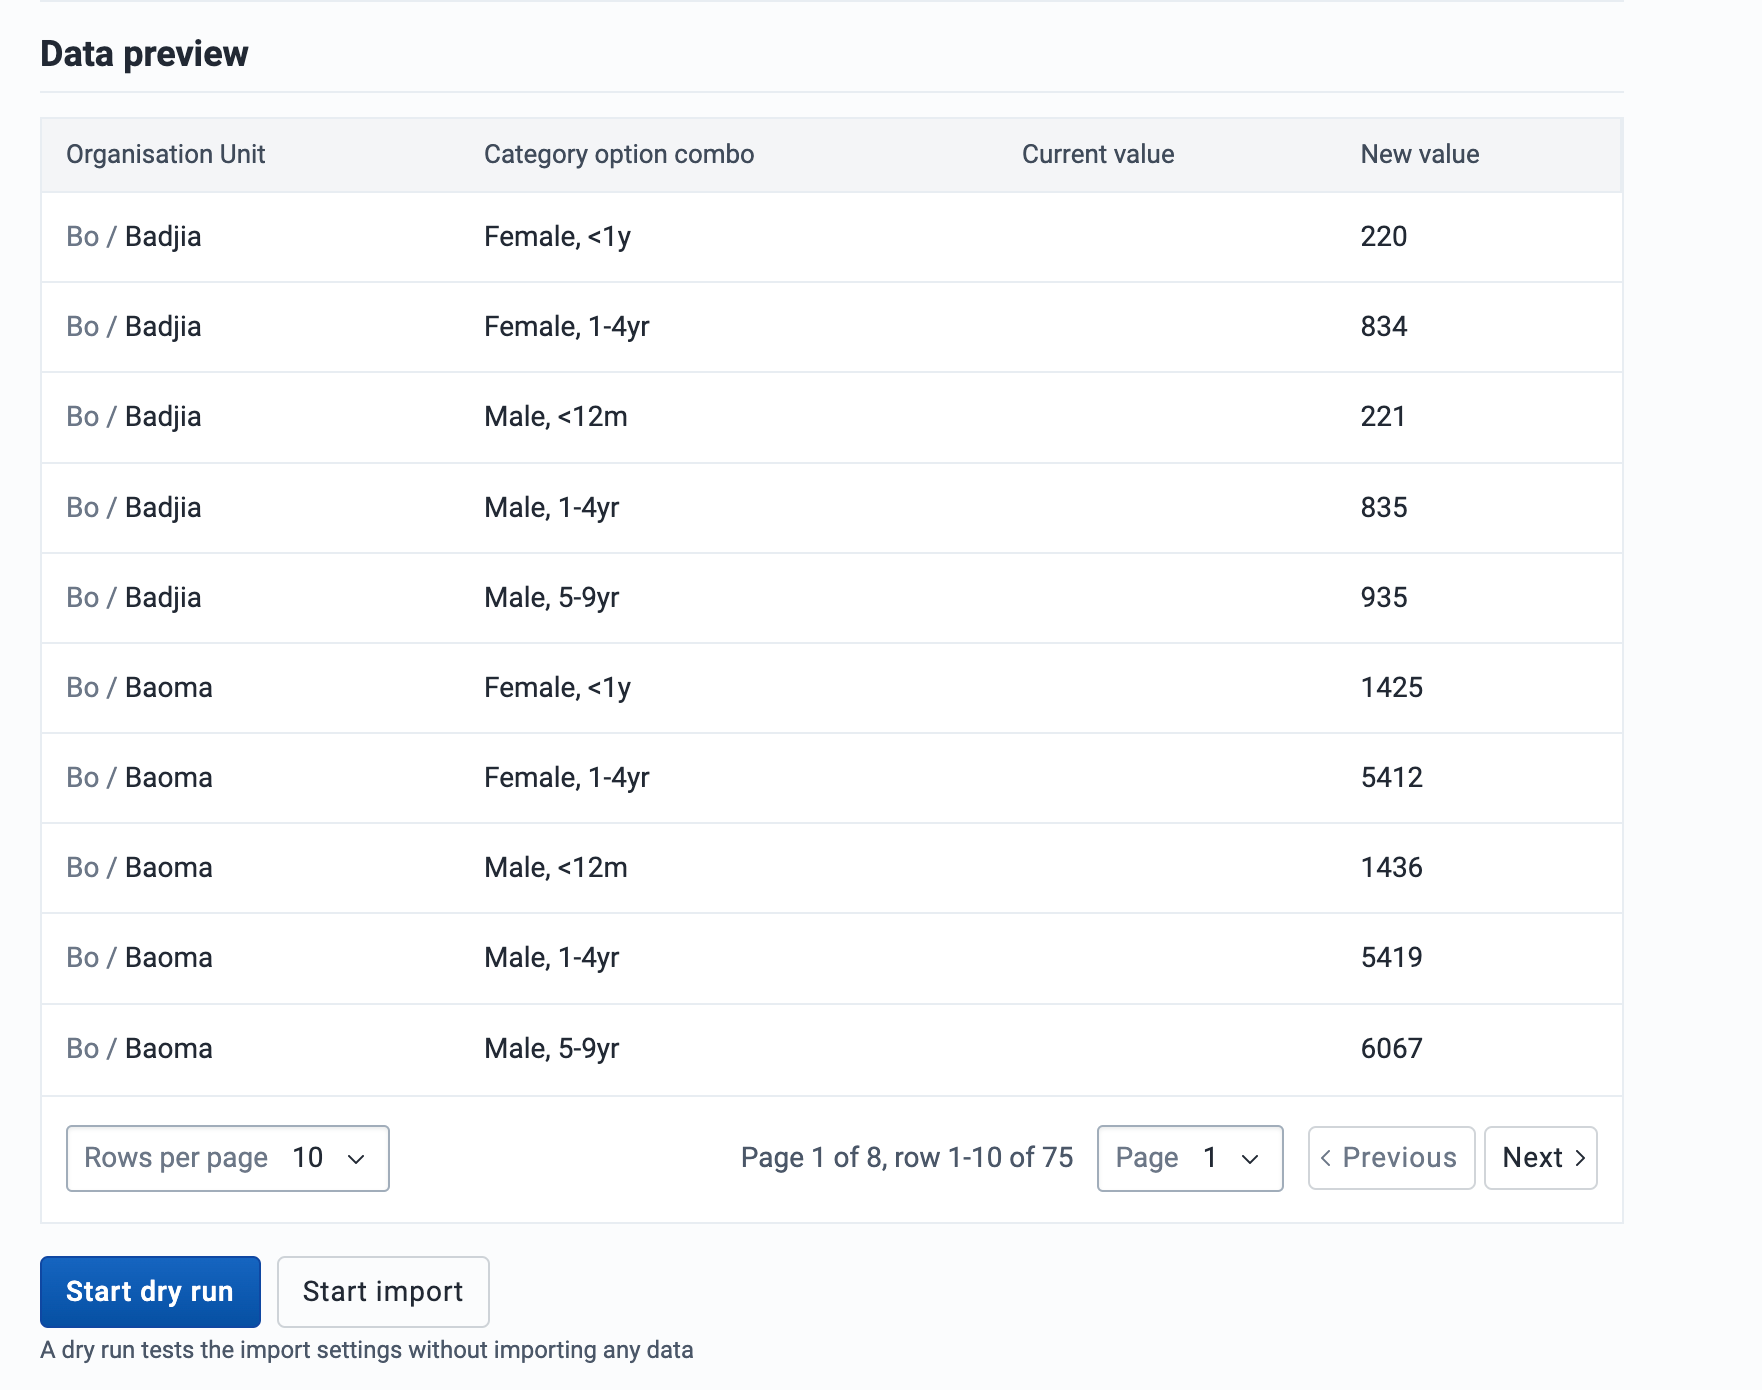
Run the import
Once the data element and category option combos have been selected, the Preview button is enabled. After reviewing the data you want to import, you can do a dry run first, or proceed with the actual import.
Organisation Unit Geometry Import
Accessed from the sidebar by clicking on Org Unit geometry import. Two geometry formats are supported: GeoJSON and GML. GeoJSON is the recommended format and can also be used to import associated geometries (catchment areas).
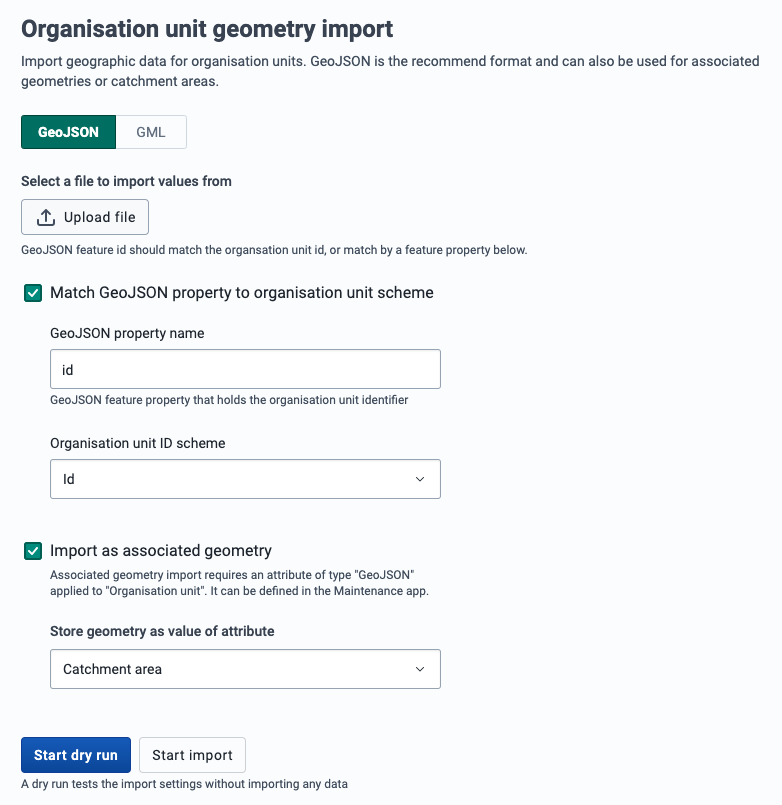
GeoJSON import
-
Upload a file using the GeoJSON format.
-
By default the GeoJSON feature id should match the organisation unit id.
-
Check Match GeoJSON property to organisation unit scheme to match by a feature propery. Type the GeoJSON property name and select the Organisation unit ID scheme (Id, Code or Name).
-
Check Import as associated geometry to import the GeoJSON features as associated geometries the organisation units (e.g. catchment areas). Select at geometry attribute where the data should be imported. This requires an attribure of type GeoJSON applied to Organisatiot unit. This attribute can be defined in the Maintenance app.
-
Click on the Start import button which will upload the file and start the importing process.
Tip
It is highly recommend to use the Dry run option to test before importing data; to make sure you keep control over any changes to your organisation unit geometries.
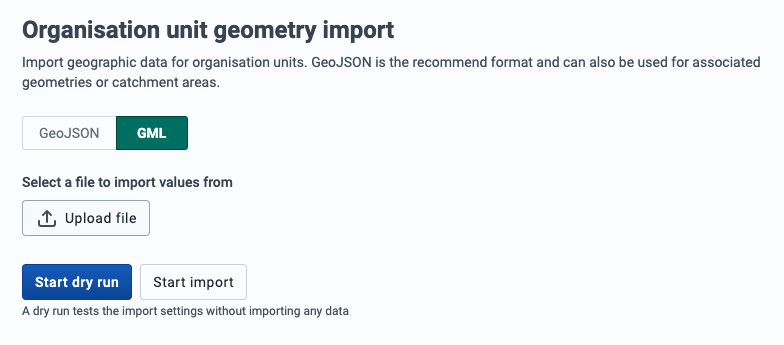
GML import
-
Upload a file using the GML (Geographic Markup Language) format.
-
Click on the Import button which will upload the file and start the importing process.
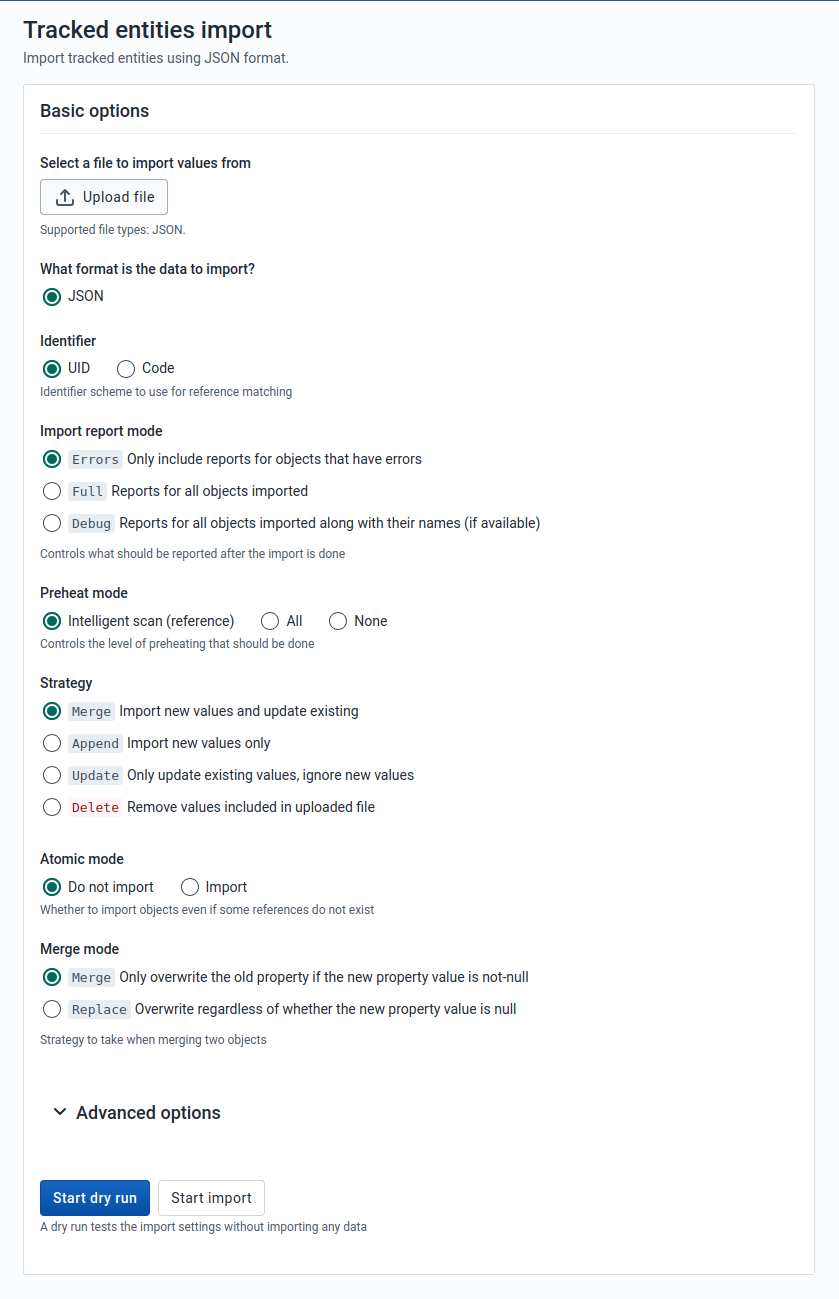
Tracked Entities Import
Tracked entities import can be accessed from the sidebar by clicking on Tracked entity import.
-
Choose a JSON file to upload
-
Select the appropriate settings for:
- Identifier
- Import report mode
- Preheat mode
- Import strategy
- Atomic mode
- Merge mode
-
Click Advanced options if you want to adjust one or more of the following settings before importing:
- Flush mode
- Skip sharing
- Skip validation
- Inclusion strategy
- Data element ID scheme
- Event ID scheme
- Org unit ID scheme
- ID scheme
-
Click on the Import button which will upload the file and start the importing process.
Tip
It is highly recommend to use the Dry run option to test before importing data; to make sure you keep control over any changes to your tracked entities.
Exporting data
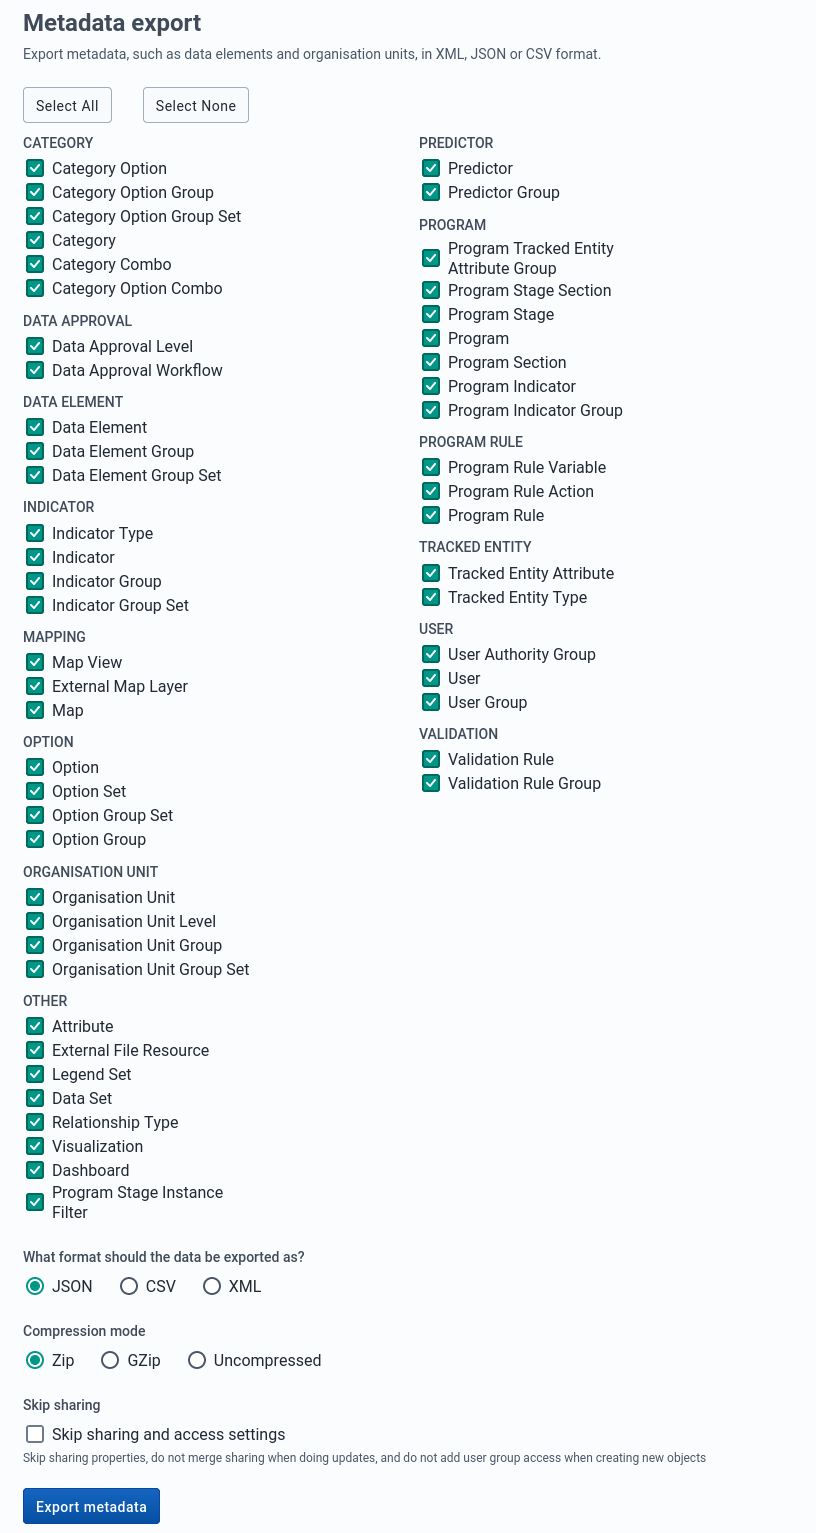
Metadata Export
Metadata export can be accessed from the sidebar by clicking on Metadata export.
-
Choose the list of objects you would like to export.
-
Select a format: JSON
-
Select a compression type: zip, gzip or uncompressed
-
Decide whether to check Skip sharing and access settings
-
Click Export metadata which will open a new web-browser window that will give you a file to download to your local computer.
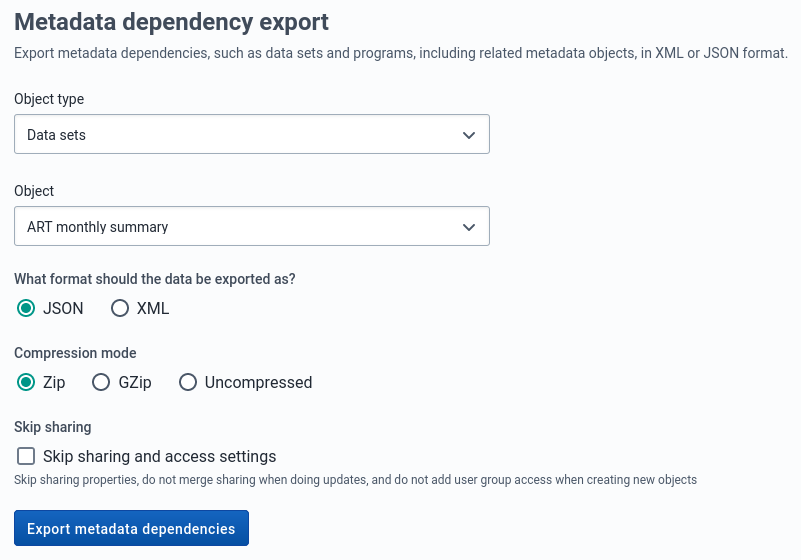
Metadata Export with Dependencies
Metadata export with dependencies lets you create canned exports for metadata objects. This type of export will include the metadata objects and the metadata object's related objects; that is, the metadata which belong together with the main object.
Table: Object types and their dependencies
| Object type | Dependencies included in export |
|---|---|
| Data sets | Data elements Sections Indicators Indicator types Attributes Data entry forms Legend sets Legends Category combinations Categories Category options Category option combinations Option sets |
| Programs | Data entry form Tracked entity Program stages Program attributes Program indicators Program rules Program rule actions Program rule variables Program attributes Data elements Category combinations Categories Category options Category option combinations Option sets |
| Category combination | Category combinations Categories Category options Category option combinations Attributes |
| Dashboard | Dashboard items Charts Event charts Pivot tables Event reports Maps Reports Resources |
| Data element groups | Data elements Category combinations Categories Category options Category option combinations Option sets Attributes Legend sets Legends |
| OptionSets | Option |
-
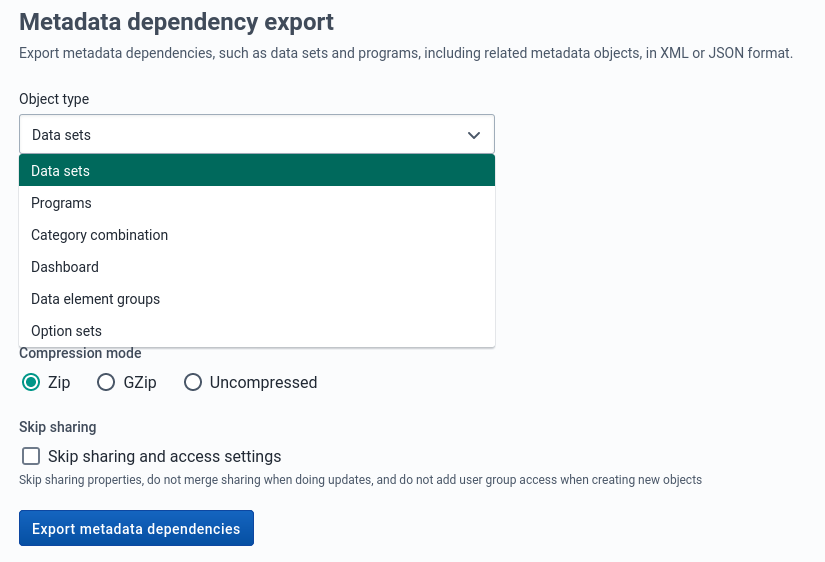
Select an object type: Data sets, Programs, Category combination, Dashboard, Data element groups or OptionSets.
-
Select an object.
-
Select a format: JSON
-
Select a compression type: Zip , GZip or Uncompressed
-
Click Export metadata dependencies which will open a new web-browser window that will give you a file to download to your local computer.
Data export
Data export can be accessed from the sidebar by clicking on Data export.

-
Select which organisation units to export from.
-
Select if you want export to include descendants of organisation units selected in Step 1 or only the manually selected organisation units.
-
Select which data sets to export.
-
Set the start and end date.
-
Select a format: JSON, CSV, XML, or ADX
-
Select a compression mode: Zip , GZip or Uncompressed
-
Click Advanced options if you want to adjust one or more of the following settings before exporting:
- Include deleted
- Data element ID scheme
- Organisation unit ID scheme
- ID scheme
-
Click Export data which will open a new web-browser window that will give you a file to download to your local computer.
Event export
Event export can be accessed from the sidebar by clicking on Event export.
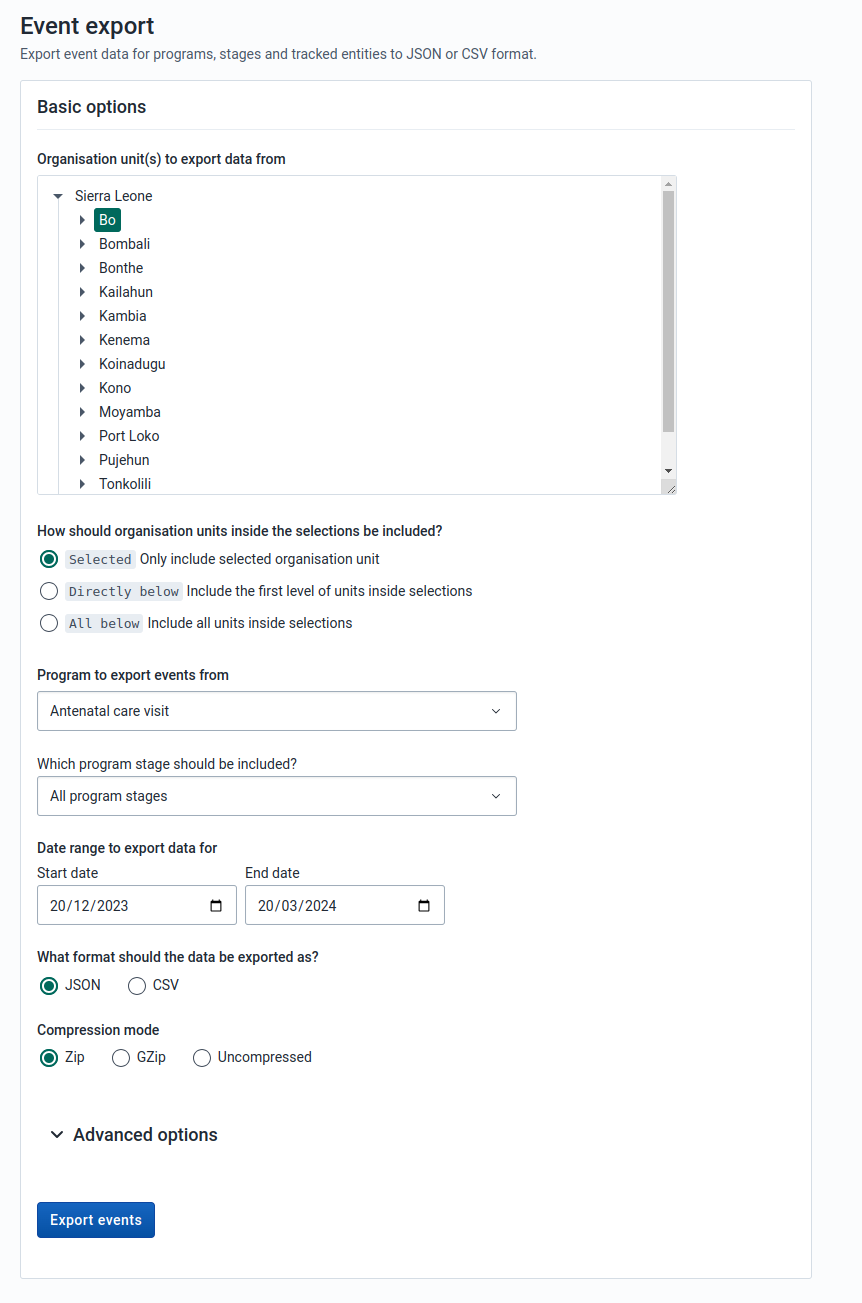
You can export event or tracker data in JSON or CSV.
-
Select an organisation unit.
-
Select the inclusion:
-
Selected: Export event data only for the selected organisation unit
-
Directly below: Export event data including the first level of the organisation units inside the selections as well as the selected organisation unit itself.
-
All below: Export event data for all organisation units inside the selections as well as the selected organisation unit itself.
-
-
Select a program and a program stage (if applicable).
-
Set the start date and end date.
-
Select a format: JSON or CSV.
-
Select a compression mode: Zip, GZip or Uncompressed.
-
Click Advanced options if you want to adjust one or more of the following settings before exporting:
- Include deleted
- Data element ID scheme
- Organisation unit ID scheme
- ID scheme
-
Click Export events which will open a new web-browser window that will give you a file to download to your local computer.
Tracked entities export
Tracked entities export can be accessed from the sidebar by clicking on tracked entities export.
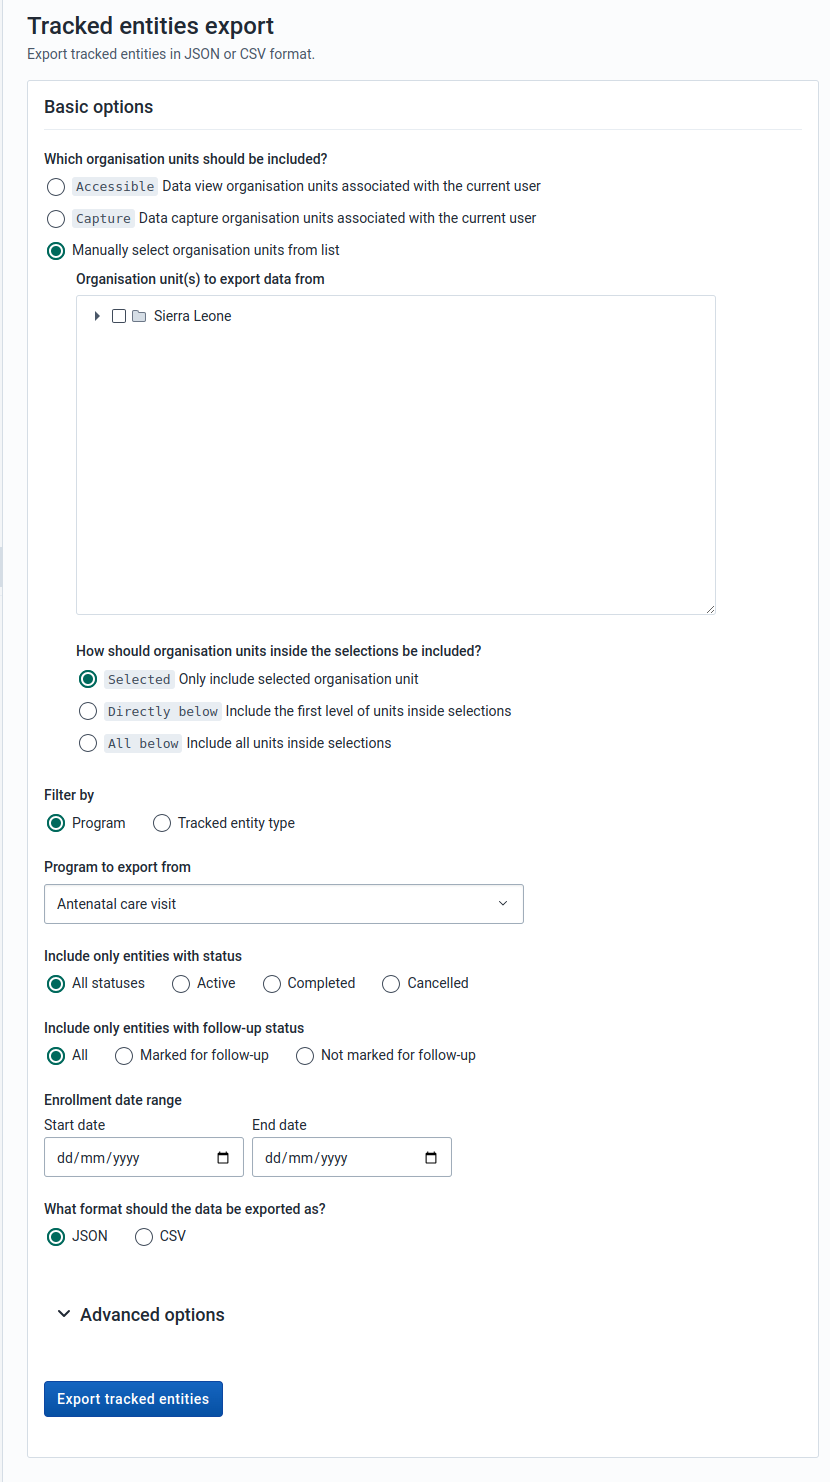
You can export tracked entities in JSON, or CSV format.
-
Select the organisation units that should be included. There are three modes for selecting organisation units:
-
Accessible: to select data view organisation units associated with the current user
-
Capture: to select data view organisation units associated with the current user.
-
Manually select organisation units: to manually select the organisation units.
-
-
If you choose to manually select organisation units then you will be presented with further options:
-
Selected: Export data only for the selected organisation unit
-
Directly below: Export data including the first level of the organisation units inside the selections as well as the selected organisation unit itself.
-
All below: Export event data for all organisation units inside the selections as well as the selected organisation unit itself.
-
-
Decide whether you want to filter by program or tracked entity type.
-
Decide what statuses to include in the export
-
Decide which follow-up statuses to include in the export
-
Select a format: JSON or CSV.
-
Click Advanced options if you want to adjust one or more of the following settings before exporting:
- Filter by last updated date
- Filter by assigned user
- Include deleted
- Data element ID scheme
- Event ID scheme
- Organisation unit ID scheme
- ID scheme
-
Click Export tracked entity which will open a new web-browser window that will give you a file to download to your local computer.
Changes to Tracker import/export in v41+
The import/export app was upgraded to use the new tracker API for importing and exporting tracked entities and events. The deprecated tracker API will be removed in v42 hence all applications are advised to upgrade as soon as possible.
This brings a lot of benefits in terms of the consistency and reliability of the import/export experience for tracked entities and events, such as better validation, error reporting and the use of a more reliable job scheduling workflow.
These benefits come with a couple of important caveats. First, the new format of the exported files is incompatible with previous versions of the app, so exports from v41 can not be imported in previous versions, and exports from previous versions can not be imported in v41. We also dropped support for XML format, and only support JSON and CSV. More context for these changes can be found in the Tracker API documentation.
Job Overview
The job overview page can be accessed from the sidebar by clicking on Job Overview.
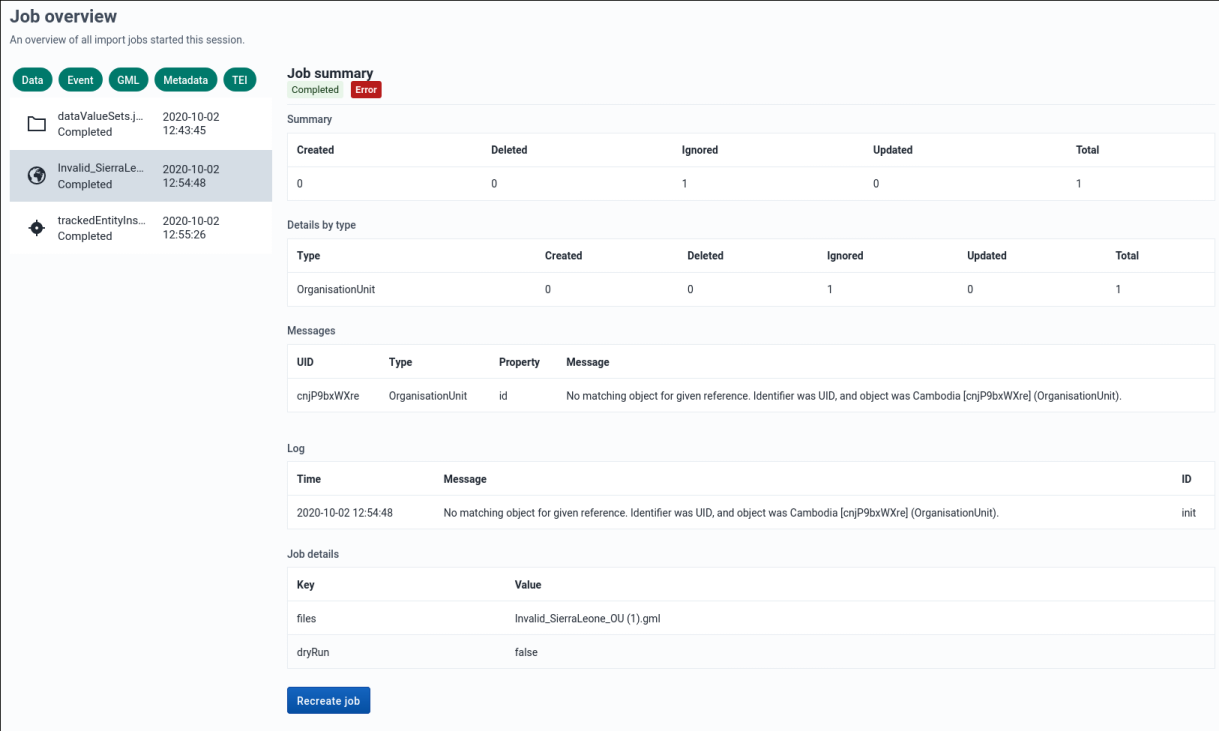
This page allows you to see the progress of all the imports you have started this session. You can see the list of all jobs on the left side and details about a specific selected job on the right.
Filtering by import job type

By default jobs of all import types are shown in the job list, but you can filter categories you are interested in by clicking on the job type filters above the job list.
Recreating a previous job

You can recreate previously run import jobs by clicking on the Recreate job button at the bottom of the page, assuming you have selected a job from the list. This will take you to the correct import page and fill in all the form details exactly as the job you chose to recreate.
Schemes
The various schemes used in many of the import and export pages are also known as identifier schemes and are used to map metadata objects to other metadata during import, and to render metadata as part of exports.
Table: Available values
| Scheme | Description |
|---|---|
| ID, UID | Match on DHIS2 stable Identifier, this is the default id scheme. |
| CODE | Match on DHIS2 Code, mainly used to exchange data with an external system. |
| NAME | Match on DHIS2 Name, please note that this uses what is available as object.name, and not the translated name. Also note that names are not always unique, and in that case, they can not be used. |
| ATTRIBUTE:ID | Match on metadata attribute, this attribute needs to be assigned to the type you are matching on, and also that the unique property is set to true. The main usage of this is also to exchange data with external systems, it has some advantages over CODE since multiple attributes can be added, so it can be used to synchronize with more than one system. |
ID scheme
The ID scheme applies to all types of objects, but can be overwritten by more specific object types.